Remote Subscriber Database (RSD) AWS hosting setup guide: Difference between revisions
No edit summary |
No edit summary |
||
| Line 47: | Line 47: | ||
== Instructions == | == Instructions == | ||
#In the AWS console, select '''Europe (London) eu-west-2''' region. | #In the AWS console, select the '''Europe (London) eu-west-2''' region. | ||
#:[[File:AWS select region.png|AWS select region]] | #:[[File:AWS select region.png|AWS select region]] | ||
#Navigate to '''CloudFormation''' by searching in the services drop-down menu. | #Navigate to '''CloudFormation''' by searching in the services drop-down menu. | ||
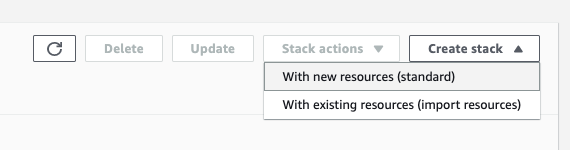
#Click '''Create stack''' and then select '''With new resources (standard)'''. | #Click '''Create stack''' and then select '''With new resources (standard)'''.<br/> [[File:Create stack.png|RTENOTITLE]] | ||
#Specify the template: | #Specify the template: | ||
##Select '''Upload a template file'''. | ##Select '''Upload a template file'''. | ||
| Line 57: | Line 56: | ||
##Browse to the location of the saved '''network-stack.yaml''' file. | ##Browse to the location of the saved '''network-stack.yaml''' file. | ||
##Click '''Next'''. | ##Click '''Next'''. | ||
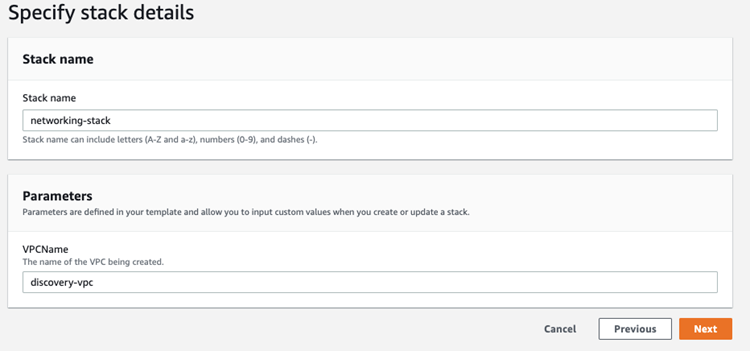
#Specify stack details: | #Specify stack details: type a stack name and VPC name.<br/> [[File:Specify stack details.png|Specify stack details]] | ||
#Configure stack options: leave the default option and then click '''Next'''. | #Configure stack options: leave the default option and then click '''Next'''. | ||
#Review the selected options and then click '''Create stack'''.<br/> Once the network stack is created (2-3 mins) you can see the resource CloudFormation has created in the '''Resources''' tab. | #Review the selected options and then click '''Create stack'''.<br/> Once the network stack is created (2-3 mins) you can see the resource CloudFormation has created in the '''Resources''' tab. | ||
| Line 72: | Line 69: | ||
== Instructions == | == Instructions == | ||
#In the AWS console | #In the AWS console select the '''Europe (London) eu-west-2''' region. | ||
#In the drop down menu, navigate to '''CloudFormation'''. | #In the drop down menu, navigate to '''CloudFormation'''. | ||
#Click '''Create stack''' and then select '''With new resources (standard)'''[[ | #Click '''Create stack''' and then select '''With new resources (standard)'''<br/> [[File:Create stack.png|RTENOTITLE]] | ||
#Specify the template: | |||
##Select '''Upload a template file'''. | |||
##Click '''Choose file'''. | |||
##Browse to the location of the saved '''endpoint-stack.yaml''' file. | |||
##Click '''Next'''. | |||
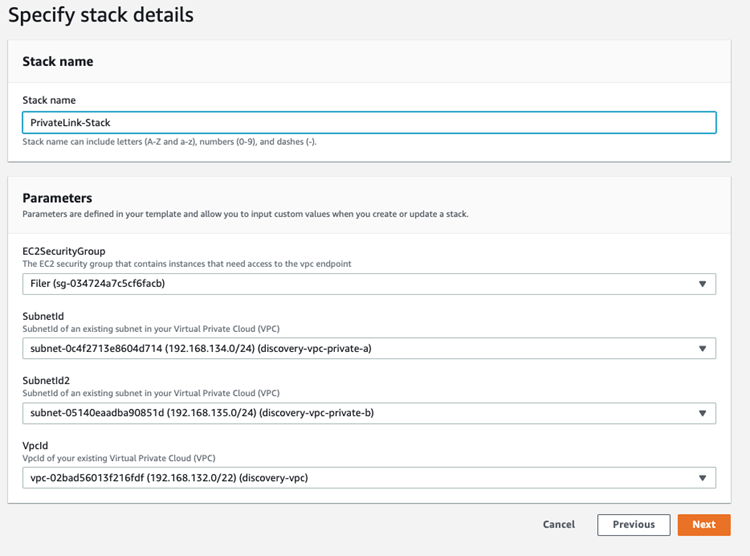
#Specify stack details: type a stack name and VPC name.<br/> [[File:Specify private stack details.png|Specify private stack details]] | |||
#Configure stack options: leave the default option and then click '''Next'''. | |||
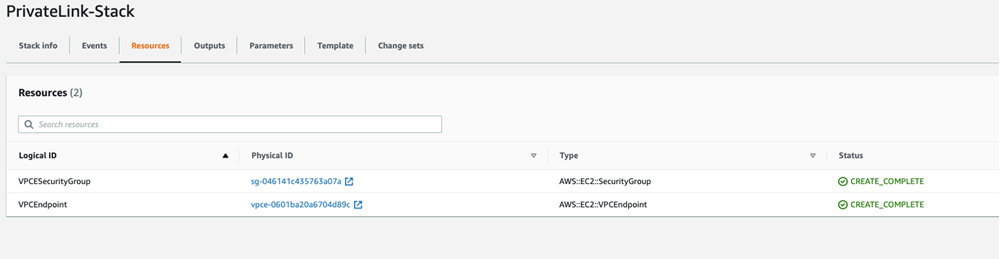
#Review the selected options and then click '''Create stack'''.<br/> Once the PrivateLink stack is created (2-3 mins) you can see the resource CloudFormation has created in the '''Resources''' tab.<br/> [[File:Private link stack.png|Private link stack]] | |||
#Click the links to view the resources: | |||
<ul style="margin-left: 40px;"> | |||
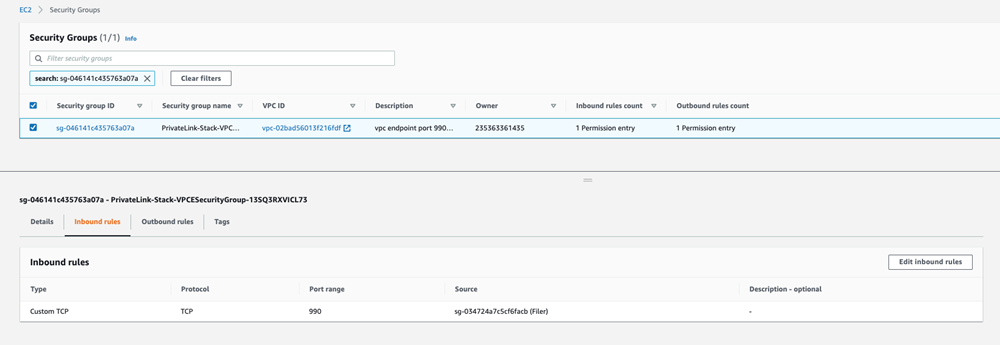
<li>Security groups<br/> [[File:Security group.png|Security group]]</li> | |||
<li>PrivateLink<br/> '''Note:''' The '''pending acceptance''' status will remain until the request has been approved in the Discovery AWS account.<br/> [[File:Private link.png|PrivateLink]]<br/> </li> | |||
</ul> | |||
Revision as of 15:46, 13 May 2020
This deployment guide covers some suggested initial installation steps if you want to run the Discovery remote subscriber database in a new Amazon Web Services account.
The installation is simplified using cloudformation (cfn) scripts that create the AWS resources on your behalf.
The following manual steps are required before and after the scripts are run:
Prerequisites
Amazon Web Services
You will require an Amazon Web Services account to run the infrastructure, If you do not already have an AWS account then you can Sign up for an AWS account here.
Please supply your AWS account number to the Discovery team prior to running the installation. The account number can be found in the AWS console here.
Create a Key Pair
- Open the Amazon EC2 console at https://console.aws.amazon.com/ec2/.
- In the navigation pane, select Key Pairs.
- Select Create key pair.
- In Name, type a descriptive name for the key pair.
- In File format, select the required save format for the private key. Tip: To save the private key in a format that can be used with OpenSSH, select pem; to save the private key in a format that can be used with PuTTY, select ppk.
- Select Create key pair.
Note: The private key is downloaded in your browser and must be kept safe; this is required to connect to the EC2 instances. Alternatively an existing key pair can be used.
AWS Cloudformation Installation - Network Stack
Note: The following subnets are hardcoded into the cfn script by default. You might need to change these according to your hosting requirements; the ACLs within the cfn script will also need updating.
VPC:
CIDR: "192.168.132.0/22"
Public0:
CIDR: "192.168.132.0/24"
Public1:
CIDR: "192.168.133.0/24"
Private0:
CIDR: "192.168.134.0/24"
Private1:
CIDR: "192.168.135.0/24"
Instructions
- In the AWS console, select the Europe (London) eu-west-2 region.
- Navigate to CloudFormation by searching in the services drop-down menu.
- Click Create stack and then select With new resources (standard).
- Specify the template:
- Select Upload a template file.
- Click Choose file.
- Browse to the location of the saved network-stack.yaml file.
- Click Next.
- Specify stack details: type a stack name and VPC name.
- Configure stack options: leave the default option and then click Next.
- Review the selected options and then click Create stack.
Once the network stack is created (2-3 mins) you can see the resource CloudFormation has created in the Resources tab. - Navigate theServices - VPC to see the resources such as subnets, route tables and ACLs.


AWS Cloudformation Installation - VPC Endpoint (PrivateLink)
Prerequisites
Note: Before you run this cfn script, you need to create a security group that will be applied to the filer instance. You then select the security group from a drop-down list when running this cfn script. This will allow the filer instance to access the sftp server via the PrivateLink.
Your AWS account number will need to be whitelisted by Discovery before running the cfn script.
Instructions
- In the AWS console select the Europe (London) eu-west-2 region.
- In the drop down menu, navigate to CloudFormation.
- Click Create stack and then select With new resources (standard)
- Specify the template:
- Select Upload a template file.
- Click Choose file.
- Browse to the location of the saved endpoint-stack.yaml file.
- Click Next.
- Specify stack details: type a stack name and VPC name.
- Configure stack options: leave the default option and then click Next.
- Review the selected options and then click Create stack.
Once the PrivateLink stack is created (2-3 mins) you can see the resource CloudFormation has created in the Resources tab.
- Click the links to view the resources:


- Security groups
- PrivateLink
Note: The pending acceptance status will remain until the request has been approved in the Discovery AWS account.


